

How to fix ‘Installation Failed: Could Not Create Directory’ error in WordPress
![]() 4 Mins Read
4 Mins Read
Looking for a way to fix the ‘Installation Failed: Could Not Create Directory’ error in your WordPress website? There are many common WordPress errors and bugs you may face while using WordPress. Bugs and errors can slow down your website and hamper the regular activities of the website.
Installation Failed: Could Not Create Directory is one of the common WordPress errors that can hamper your website’s key functionalities or features. But don’t worry fixing the error is very easy and simple. By following some easy steps you can get rid of this error.
Here in this article, we will discuss the reason behind the Installation Failed: Could Not Create Directory’ error and guide you to fix the error in an easy way.
Reasons behind the Installation Failed: Could Not Create Directory error in WordPress
WordPress has two important components: database and file directories on the server. When we install a theme or plugin on our WordPress website using the WordPress admin dashboard it needs to create a file directory on the server with the theme or plugin name. The file directory will store the files of the theme or plugin.
But when you are installing a theme or plugin on your website that doesn’t have the file permission then the process won’t be complete. WordPress won’t be able to complete the installation process and it will show the Installation Failed: Could Not Create Directory error message on your website.
For a new WordPress website, the error occurs most of the time. When this error occurs the server won’t allow you to make any changes to the theme or plugin. There are many reasons that your server doesn’t allow you to add files, one of the common reasons is low disk space on the server. If your server is running out of space then it won’t have enough space for additional files and show an error message when you try to install a plugin or theme.
Updating theme or plugin
Sometimes you can see the error message when you are trying to update an installed theme or plugin on your website. Like installing a new plugin, updating the plugin also needs rewriting the file on the server. So if the permission setting is not correct or if there is not enough space on your server then it won’t be able to access the old file and rewrite new files. So the update process won’t be complete and show the error message on your website.
Uploading file to WordPress content directory
Server file permission is a great feature for your website that doesn’t allow any third party to access and write your file on the server. But sometimes you can lock yourself out with this feature if it was not configured properly. This problem doesn’t occur on a WordPress installation, it happens because of a server problem.
Sometimes the error affects your website wp-content/upload subdirectory. When you add an image or other files on your website it also needs permission from your server. If the error affects the wp-content/upload subdirectory then you won’t be able to add images to your websites too.
How to diagnose the “Installation Failed: Could Not Create Directory’’ error
Before fixing the error you need to diagnose the error properly. Most of the time changing the file directory will solve the issue but you need to make sure that. To diagnose the error WordPress Site Health tools will help you. Go to your WordPress admin dashboard and move on to Tools > Site Health. Now move on to the Info tab to see the file permission settings. Scroll down to find the FileSystem Permission menu and expand it. Here you will be able to see important WordPress file directories.

All the file systems should be Writable. If you have any problem then it should be listed as Not Writable on the problematic folder. If you found any issue you need to correct the file permission.
Fix the “Installation Failed: Could Not Create Directory’’ error in WordPress
If the file permission is causing the error then you need to change the file permission. To change the file permission, first, you need to connect your WordPress website with an FTP client. After connecting your Website locate the wp-content folder and right-click on it. Click on the file permission option.
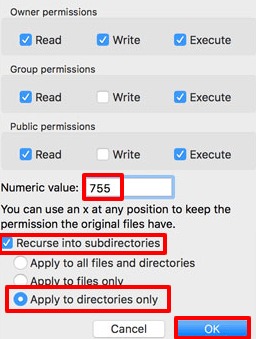
It will show you the permission for that file. Based on your FTP clients the interface may look different. Here you can find a field named Numeric Value. Here in this field set the value 755.
After that check the Recurse into subdirectories and apply to directories only. When everything is done click on the ok button to save the changes.
When you are done click on the OK button and return to your website and try to upload a file. The error should be gone and you will be able to upload the file again on your WordPress website.
Wrapping Up
Following the process, we will be able to fix the ‘Installation Failed: Could Not Create Directory’’ error in your WordPress website. You can see our other articles to learn How to fix the 501 Not Implemented error in WordPress
How to fix the invalid JSON error in WordPress
How to fix the 413 request entity too large error in WordPress
We hope this article will help you. If you like this article please like our Facebook page to stay connected.