How to find and access WordPress error logs
Looking for a way to find and access the WordPress error logs then you are at the right place. The wordPress error log will help you to troubleshoot and identify issues on your WordPress website. The default debugging system of WordPress helps you to find out and display all error messages on your website so that you can easily fix them. Here in this article, we will guide you to the easiest way to find and access WordPress error logs.
What are WordPress error logs and when to use them?
An error log is a list of the error messages that are happening on your website with the exact date and time. When you enable WordPress to debug mode, it will collect all the error reports on a file. So you can review the error logs at your preferred time. On the other hand, you can say that the WordPress error log is a troubleshooting tool to identify themes. plugins, or WordPress core problems and bugs.
Using the WordPress error logs will identify and fix errors like Syntax errors, too many redirect issues, white screen of death, connection time out, maintenance errors, server errors, PHP errors, and others.
Enabling WordPress to debug mode manually
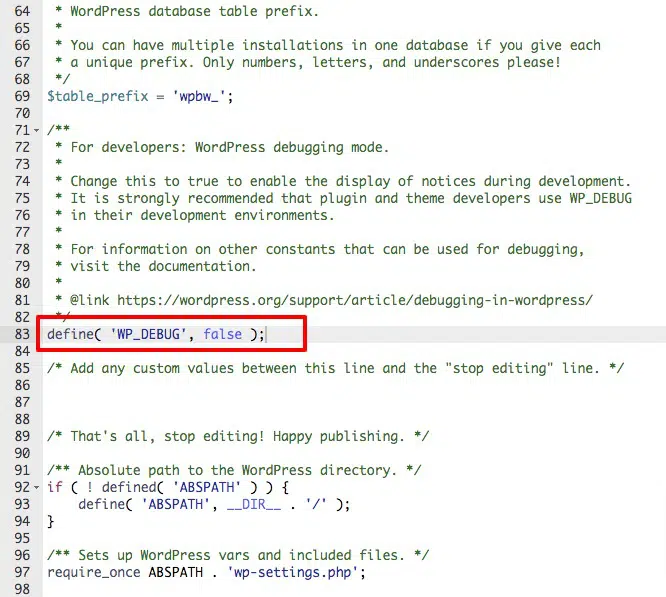
you need to edit your website’s wp-config.php file on your website. You just need to add a few code snippets on the wp-config.php file. To access the file you need to connect your website with an FTP client or Cpanel.
Login to your website Cpanel account and then go to the file manager option. From the file, the manager goes to your website file directory. You will find the wp-config.php there.
Now open the file and add the following code at the end of the file.
define( 'WP_DEBUG', true );
But if your wp-config.php has already the debug code set as false then you don’t need to enter the code again. You just need to change the false value into true. It will enable the debug mode.

Enabling WordPress debug mode using a plugin
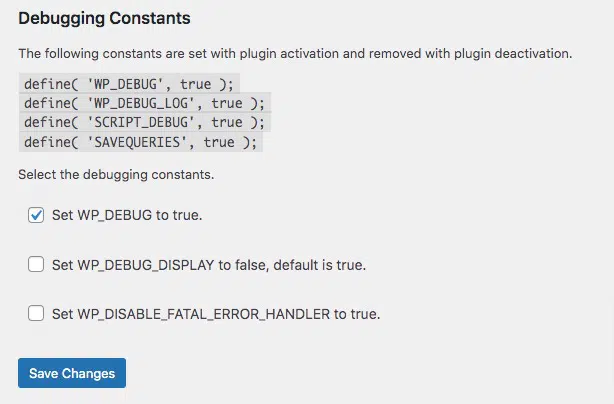
If you don’t want to add code to your website then using a plugin is the easiest and quickest solution for you. Here in this tutorial, we are using the WP Debugging WordPress plugin. Install and activate the plugin and go to Tools > WP Debugging page to configure the plugin.

Access WordPress error logs
After enabling the WordPress debug mode the future error logs and bug reports will be stored on the error logs and you can see them anytime you want. So initially there will be no logs report. When an error or bug happens the log list will update automatically. So if you want to see the log list then you need to create errors or bugs manually.
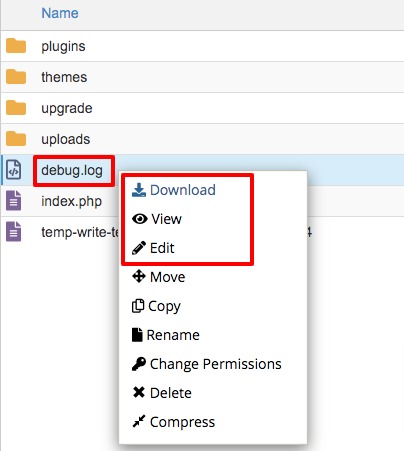
Now to see the log file you need to connect your website to an FTP client or login to your website through Cpanel. Login to your Cpanel account and go to your website folder from the file manager option. Now go to the /wp-content/ repository where you will find a file named debug.log.
Here in this file, you will get all your error and bug reports that happened on your website. Right-click on the debug.log file and you will see different options. To see the error logs you need to edit, view, or download the file.
This list will show all the error logs with the date and time. You need to analyze the error logs and fix the error.
Disable WordPress debug mode
When you find and solve the error, you need to disable the debug mode. Enabling the debug mode all the time sometimes makes your website slower which affects the overall performance of your website. If you enable the debug mode manually then you need to edit the wp-config file again. Just change the following line ad it will disable the debug mode.
WP_DEBUG and WP_DEBUG_LOG lines from “True” to “False”
If you are enabling the debug mode using a plugin then you need to deactivate the plugin. For this go to Plugins > Installed Plugins and deactivate the WP Debugging plugin.
Following the process, you will be able to find and access WordPress error logs. You can see our other articles to learn How to fix your website structure
How to fix blurry product images in WooCommerce
How to fix WordPress database update required loop
We hope this article will help you. If you liked this article, please like our Facebook page to stay connected.


